Fri Oct 1 12:53:03 PDT 2004
Ammonite
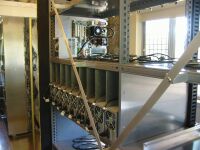
Ammonite is a beowulf cluster built by me (Jack Wathey) and Tom Bartol.
It was built for a problem in computational biology that is not
communication bound. Important design constraints were limited space
and budget. It is basically a cluster of bare, diskless motherboards
in a customized enclosure. Some crazy people just get seized with the
compulsion to build something like this, and I confess to being one of
those. For those similarly seized who have not yet started building,
my experience might be helpful, so I'm putting this info on the web
(many thanks to Per Jessen for hosting it).
Perhaps the most helpful thing I could say is to urge you to consider
building a conventional cluster (shelves of COTS midtower cases
or racks of 1U pizza boxes) instead of something like ammonite.
The ammonite design has some advantages (high cpu density, better
ventilation and lower delta-T, for example), but designing and
building it was a colossal time sink. I don't know exactly how long
it took, but the upper bound is 15 months. Yes, MONTHS. That's the
total elapsed time, start to finish. In fairness, not all of that
time was spent on ammonite. I was writing lots of code and running
experiments on ammonite's predecessor during many of those months.
Much time was spent waiting for electrical renovations, trying to get a
bios fix from a motherboard vendor, suffering through the RMA process
with a memory vendor, etc. Even so, I am sure the time spent purely
on design, purchasing, construction and testing was multiple months.
A more competent machinist than I could have done it faster, because I
tend to move slowly and carefully when learning new things. There were
many little things that had to be custom made or modified, no one of
which was a big deal, but all of which together were a very big deal.
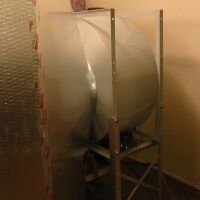
I named it "ammonite" because it reminds me of that marvelous shelled
cephalopod: much of the volume is a tapering hollow shell, with all
the interesting stuff at the wide end. It even has tentacles, in
a way. That ammonites are extinct also seems fitting, considering
how rapidly our clusters become obsolete.
The electronics:
100 dual Athlon nodes, Gigabyte Technologies ga7dpxdw-p motherboards,
Athlon MP2400 processors, 1GB ecc ddr memory per node (Kingston).
http://tw.giga-byte.com/Server/Products/Products_ServerBoard_GA-7DPXDW-P.htm
Each motherboard has its own 250W pfc power supply:
http://www.sparklepower.com/
The CPU coolers are Thermalright SK6+ all-copper heatsinks
with Delta 38cfm fan; thermal compound is Arctic Silver 3:
Thermalright SK6+ at www.crazypc.com
The switch is HP procurve 5308xl with one 4-port 100/1000-T module
(model j4821a) and four 24-port 10/100-TX modules (model j4820a).
The server node is in a conventional mid-tower case with a scsi raid
5 system (Adaptec 2120s) and uses a Gigabit NIC (SysKonnect SK-9821).
The 99 client nodes (bare motherboards in the shelves) are diskless
and boot via PXE using the 100Mbps on-board Ethernet interface.
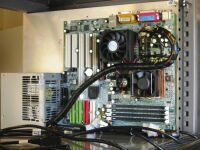
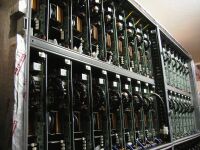
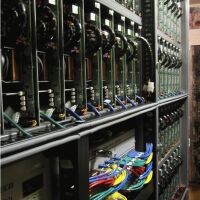
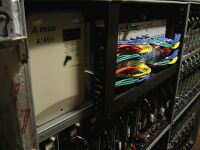
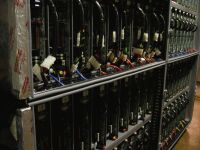
Each client node is a motherboard, 2 cpus with coolers, memory, power
supply, a sheet of 1/16" thick aluminum and NOTHING ELSE. No pci
cards of any kind, no video card. The only connections are a power
supply cord and a cat5e cable. The bios is set to boot on power-up
and to respond to wake-on-lan. There are 17 surge protectors on the
left and right ends of the shelving units, each of which supplies 6
client nodes, except one that only gets 3. I bring the cluster up
by turning them on in groups of 6, a few seconds apart.
The mechanical stuff
The shelves are Tennsco Q-line industrial steel shelves:
http://theonlinecatalog.com/execpc/view_product.cgi?product_id=1314
There are many alternative shelves that would work as well, and some
are easier to assemble than these, but these were easily adaptable to
my client node dimensions. Each 36" x 18" shelf has 9 client nodes on
it, except for one shelf that has the Ethernet switch and controller
for the blower (see below). The whole cluster is in a rack made from
two shelving units. Each shelving unit is 7ft tall by 3ft wide;
the whole thing is about 7ft x 6ft. Each of the 2 units has seven 36"
x 18" shelves. If I had it to do over again, I might use the 36"
x 24" size instead, because I had some problems with the power cords
at the back interfering with the cross braces. I ended up
making my own cross braces on aluminum standoffs to get the extra
clearance (yet another example of how this kind of approach ends
up eating more time than you expect). The seven shelves are 14"
apart vertically, which gives about 12.6" vertical clearance between
the top surface of a shelf and the underside of the shelf above it.
The top shelf just serves as the "roof" of the enclosure, so there
are 6 usable shelves per unit, or 12 total for the whole 2-unit rack.
One, near the middle vertically, has the Ethernet switch and inverter.
The other 11 have 9 nodes each, 4" apart horizontally.
Mechanically, a client node starts as a 17.75" X 12.5" sheet of
1/16 aluminum (6061 T6). These were cut to my specs by the vendor,
Industrial Metals Supply:
http://www.imsmetals.com/
Tom Bartol used the milling machine in his garage to drill the holes in
the aluminum sheets in stacks of 10. The locations of these holes need
to be precise, and there were 13 holes per sheet (10 for motherboard
standoffs). Without Tom's milling machine and expertise, the drilling
would have been a nightmare, and I would not even have attempted it.
I used nylon standoffs for the motherboards:
http://www.mouser.com/ (search for Mouser part #561-A0250)
The motherboards are properly grounded by virtue of the ground wires
in the connector to the power supply, as are the aluminum sheets,
but the standoffs are nonconducting. The standoffs just snap
into the aluminum sheets (which are 1/16 inch thick) and snap into
the motherboard holes. There are no threads and no nuts involved.
Snapping them into the aluminum is easy if you use a 3/16" nut-driver
to hold the standoff as you push it in. The holes for these standoffs
must be drilled with a #24 bit (0.152 inches).
The power supply cables are all protected from cuts and abrasion by
plastic spiral wrap:
http://www.action-electronics.com/jtsw.htm
Many thanks to my dear beloved wife, Mary Ann Buckles, who spent
many hours helping me to wrap PS cables!
The steel shelves are horizontal, of course, and the aluminum sheets
sit on them vertically (perpendicular to shelf, 12.5" tall, 17.75"
deep). The power supply also sits on the shelf, at the back of
the rack, and is attached to one corner of the aluminum sheet with
two screws through the sheet and 2 small 90-degree steel brackets.
The PS is oriented so that its exhaust blows out the back of the rack.
The motherboard is mounted on the same side of the aluminum as the PS,
oriented so that airflow (which is front-to-back through the rack)
is parallel to the memory sticks. This also puts the cpus near the
front of the rack, where the air is coolest. Putting the PS at
the bottom like this makes the node more stable. A node will stand
quite stably on the shelf, even though the only surfaces contacting
the shelf are the PS and one edge of the aluminum sheet. Even so,
I attach the top front corner of each sheet to the shelf above it
with a 1-inch steel corner brace (Home Depot) riveted to the aluminum
sheet. A 6-32 nylon thumbscrew attaches this corner brace to a
90-degree threaded steel bracket:
http://www.mouser.com/ (search for Mouser part #534-4334)
which is attached to the underside of the shelf with a sheet metal
screw. Removing a node is easy: just remove the nylon thumbscrew
and it slides out. The horizontal spacing of the nodes is limited
to about 4" minimum by the minimum dimension of the PS and by the
need for breathing room for the cpu coolers.
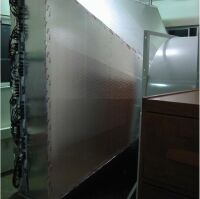
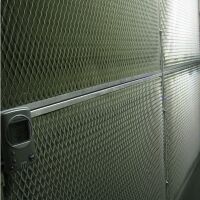
The front edge of every other shelf has a 2" x 1" cable duct, through
which the cables are routed. Near the switch, the ducts expand to
2" x 2". The cable ducts also serve as the mounting surfaces for 6
custom-made air filters, each of which is 28" x 36.38" x 0.5" thick.
The filters are Quadrafoam FF-5X, 60ppi half-inch thick, with aluminum
grid support on both sides, from Universal Air Filters:
http://www.uaf.com/pro-quadrafoam.asp
The filters seat against rubber weatherstripping gaskets (Frost King
X-treme rubber weatherseal, 3/8" x 1/4" self-adhesive, from Home
Depot) and are secured with magnetic latches.
Although the filters do clean the incoming air, their main purpose
is to provide just enough resistance to airflow to make the airflow
uniform for all nodes in the rack. Which brings us to...
Ventilation
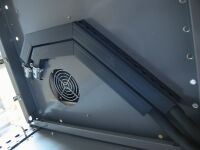
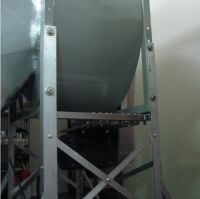
The back of the rack is covered with a pyramid-shaped plenum made
of 1-inch thick fiberglass duct board (Superduct type 475):
http://www.johnsmanville.com/
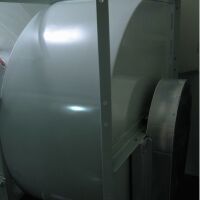
This leads to the intake of a 10,000 cfm forward-curve, single-inlet
centrifugal blower with 5hp 3-phase motor:
http://www.grainger.com/ (search for Grainger part #7H071)
The speed of the blower is controlled by a Teco Westinghouse FM-100
inverter:
http://www.tecowestinghouse.com/Products/Drives/fm100.html
I run the blower at about half its rated speed most of the time, and
this keeps the nodes happy. Delta-T between intake and exhaust is
about 10 to 15 deg F. At full speed it drops to about 5 to 7 deg F.
The blower is quiet, especially at half speed. Most of the noise
comes from the Delta fans on the cpu coolers.
Advice: Do not try to ventilate a rack like this using axial fans,
no matter what their rated cfm. They will not move anything near
their rated cfm against the resistance of the motherboards, filters
and ductwork. It MUST be a centrifugal blower.
Software
Debian/GNU Linux, kernel 2.4.20, customized by Tom for diskless
booting of the clients via PXE.
Problems
There were lots of little unexpected setbacks, too numerous to list.
I've mentioned a few already. To estimate how long it will take you
to build an ammonite-style cluster, use Hofstader's Law, which
states:
"It always takes longer than you expect, even when you take into
account Hofstader's Law."
We never found a dual-Athlon board that does a sensible implementation
of wake-on-lan. The ga7dpxdw-p boards that we ended up using will
only respond to wake-on-lan after they have been shutdown with a
soft "poweroff" command. If you turn off their surge protectors,
wait a few minutes, and turn the surge protectors back on, the boards
will not respond to wake-on-lan. To work around this, we set up the
boards to boot on power-up, so that they boot immediately when the
surge protector comes on.
We had a choice between two similar variants of this GigaByte
Technologies server board, the ga7dpxdw and ga7dpxdw-p. The ga7dpxdw
is supported by lm_sensors, the ga7dpxdw-p is not. The ga7dpxdw-p
has automatic shutdown on cpu overheating, the ga7dpxdw does not.
We decided the auto-shutdown was more important and used ga7dpxdw-p
for all but one of the nodes, a ga7dpxdw that sits in the middle of
the rack, and from which we can monitor temperatures with
lm_sensors. The cpus have never come anywhere close to the shutdown
temperature.
One final annoyance persists, which we just put up with for now.
When we power up the clients, inevitably 10 or 20 of them boot with
the delusion that they have only one cpu. If we do
grep processor /proc/cpuinfo
we get only one line, and the machine really does use only one of
its two perfectly good cpus. It's not the same 10 or 20 each time,
either. It appears to be fairly random. If we reboot these nodes,
they usually come up with both cpus recognized on the 2nd or 3rd try.
But once all the nodes have booted with both cpus, the cluster
runs reliably. My best guess is that this problem has something to
do with heavy contention for nfs disk access as multiple nodes are
booting simultaneously. If anyone has any suggestions as to what is
causing this and how to fix it, please let me know (wathey@salk.edu).
Aside from that quirk, ammonite works well and is a pleasure to use.
Building it was fun, too, at least until it all started to become
overwhelming.
Text:   Copyright (c) 2004, John C. Wathey
Photos: Copyright (c) 2004, Thomas M. Bartol, Jr.
License is granted to copy or use the documents (the various personally
authored and copyrighted works of John C. Wathey and Thomas M. Bartol, Jr.
provided on this website and so indicated) according to the Open Public
License, http://www.opencontent.org/openpub/,
which is a Public License that applies to ``open source'' generic
documents developed by the GNU Foundation.
In addition there are two modifications to the OPL:
Distribution of substantively modified versions of these documents is
prohibited without the explicit permission of the copyright holder.
For-profit distribution of the work or any derivative of the work in any
media is prohibited unless prior permission is obtained from the copyright
holder. (This is so that the authors can make at least some money if this
work is republished in any form and sold commercially for -- somebody's --
profit. The authors do not care about copies photocopied or locally
printed and distributed free or at cost to students to support a course).

